Most of
the application in the ios requires server interaction but there can be times
when you would like the application to store data locally. In
such conditions you can use sqlite or core data.
I already
have a post, which deals with core data, and hence in todays post we will be
having a look at the CURD (Create, Update, Read, Delete) operations using
sqlite database.
SQLITE is
a light weighted database, which helps you to store your application related data tables in which you can store data and retrieve them with the help of SQL queries.
In this
tutorial we will learn how to create the sqlite database with few tables in it
and in the next session we will use that database to perform CURD operations.
There are various ways by which you could create database in your mac machine one of the most commonly method used is by using the terminal but the hurdle by using that approach is that if you miss out a command or type it wrong then you are stuck with the tons of error messages on your screen.
The method that i follow to create sqlite DB for my applications is by using the Add-on provided by firefox browser which i feel is one of the most simplest way of creating an sqlite database for your application. By following the given steps you can create sqlite database for your iOS application.
The method that i follow to create sqlite DB for my applications is by using the Add-on provided by firefox browser which i feel is one of the most simplest way of creating an sqlite database for your application. By following the given steps you can create sqlite database for your iOS application.
Step 1:
Open Firefox browser and from the tools tab select Add-ons.
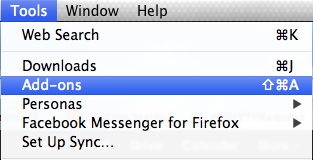
when you hit the Add-on button you will be navigated to the screen just like the one given below

Towards the right hand side of the screen you can see a search bar where you have to type the following keyword "SQlite Manager" and hit the enter keyboard button.
After doing that you will get a list of available add-ons from which you have to select the first one which says SQlite Manager the one which we are looking for, make sure you select the Available Add-ons section just like shown in the below image

Hit the install button given at the right hand side.

After installing the SQlite Manager firefox will ask you to restart the browser, hence kindly restart your browser and then after restarting it again select the tools menu and this time you will see the sqlite manager add-on added to your browser.

Step 2: Now open the firefox browser select tools and from the tools menu select the SQlite Manager add-on, now we are going to create a blank database and add tables inside that database, click on the blank page like option towards your left of the sqlite manager tool

After selecting the blank page like menu the tool will ask you to enter your database name and then it will prompt you to save the database to a particular location.

After saving the file to the desired location of your choice its time to add tables inside your database.
Step 3: After creating the database you can see several options towards the left hand side of the sqlite manager among which there is one option called as the "Tables", kindly right click it so that you can see the option to create table.

Once you do that you will get the below view

Step 4: Now as per your business logic kindly add the column name of the table along with the data type, one habit as a developer you should have and that is to mark your first column entry as primary keys.

Give your table a valuable name and hit the ok button given at the bottom, after pressing the ok button it will ask your permission to execute the given query as per your settings that you did just now.

Step 5: Press the YES button to proceed, after you hit the press button it will add one table in your database which you may view by selecting the tables section towards your left.

Now as you can see from the above image we have successfully added the Employee table in our database. Accordingly you may add one or more table in your database.
In case if you think that you have missed out a column to add then no need of deleting the table, first select the table in which you want to add your new column and then simply select the structure tab

scroll a little bit so that you can see the add column button

As per your business logic you can add the missed out column name and assign a datatype to it, and once you are done just hit the Add Column button and your new column will be added to your table.
I hope that this tutorial has helped you out for creating your own sqlite database and in case if you have find any point confusing then feel free to ask me via comments or via mail until then Happy iCoding and have a great day.
Move to second part of sqlite tutorial.
Move to second part of sqlite tutorial.
how to acces particular created database using xcode
ReplyDelete@Amol Jadhav : If you run the application in the iOS simulator then in that case you can go to the document directory folder and see your database there,
ReplyDeleteIf you want to access the database of your app (in the development process) using xcode then you have an option in the organizer for that where you need to select your device application section and download the package content at your desktop and view it.
The package content will contain your database, which is currently present in the device, but this process is valid only at development process and not on the release mode.
Hope this answers your query and if not then please provide more details of your question
This is very helpful webside for me
ReplyDeleteThank You
Thanks for the information your article brings. I see the novelty of your writing, I will share it for everyone to read together. I look forward to reading many articles from you.
ReplyDeleteJava Training in Chennai
Java Course in Chennai